


Hey Everyone. I have my very first guest poster here today and she also happens to be one of my sponsors. Lacie from I'm Simply Momma is just the sweetest thing and today she has a really fun project she wanted to share. I can't wait to try it.
Hello to all your lovely faces out there! My name is Lacie & I blog over at Im Simply Momma. I'm so excited to be guest blogging here at Mommy....A work in progress. Ashley is such a sweet lady. I stumbled on her blog the last few months and she has become a daily read for me! Today I wanted to share a little DIY 12 days of Christmas advent calendar I made. But first, I thought I would share a little about my self.
Hello to all your lovely faces out there! My name is Lacie & I blog over at Im Simply Momma. I'm so excited to be guest blogging here at Mommy....A work in progress. Ashley is such a sweet lady. I stumbled on her blog the last few months and she has become a daily read for me! Today I wanted to share a little DIY 12 days of Christmas advent calendar I made. But first, I thought I would share a little about my self.

This is my little family!
I am a 20 something year old wife and momma to the two best boys the world has ever known! My son is the cutest little 10 month old you have ever seen ;) [I may be just a little biased]
My Husband and I have been together 6 1/2 years and married for the last 1 1/2 years. He is my best friend and I would be completely lost with out him. I blog about my life playing my two main roles..momma and wife. I throw in a little of everything though. I do DIY projects sometimes...which I always promise will be simple since I'm new to this whole crafting thing. I sometimes cook, and if I do I'll share with you some yumminess. I'm a licensed master Esthetcian, so I'll post some skin tips every now and again (if you have a specific question on skin, ask me! Maybe I can do a post for you?) & then whatever else I feel like sharing with you that day. So come stop by and stay a while if you like what you see!
Now, onto this 12 days of Christmas im so excited for! I got the idea off of a show I'm
It is called Good Things Utah.
Supplies you will need:
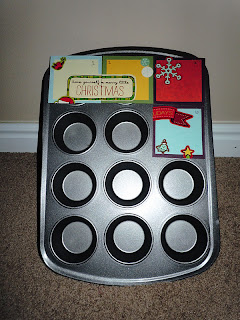
*cupcake pan [got mine at walmart for 4 bucks]
*paper
*glue
*stickers or other embellishments
*scissors
*double sided tape [original design called for magnets, but I didn't have any on hand, but I had tape :)]

Step 1:
Cut 12 squares of paper at 3.25 inches. Then cut 12 squares of paper at 2.75 inches.
 Step 2:
Decide on an arrangement for you paper, and glue the smaller squares onto the larger ones
Step 3:
I put some large stickers onto multiple squares, so that they would go together once everything was in place.
 Step 4:
Turn the squares over and cut the stickers so the squares are separate again.

At this step I used double sided tape, I feel the magnets would have worked a little better. It can be hard to get the tape to stick to the pan. I will be switching it out soon.

Step 6:
Fill each opening with something for each of the twelve days of Christmas. You could do candy for each day. Or have a different activity for each day, things like baking Christmas cookies, reading a Christmas book, going out to see Christmas lights, etc. Pretty much anything you can think of you could do. Have fun with it and experiment with different ways to personalize the advent calendar.
Cut 12 squares of paper at 3.25 inches. Then cut 12 squares of paper at 2.75 inches.

Decide on an arrangement for you paper, and glue the smaller squares onto the larger ones
Step 3:
I put some large stickers onto multiple squares, so that they would go together once everything was in place.

Turn the squares over and cut the stickers so the squares are separate again.

Step 5:
Attach each piece of paper over each opening on the cupcake panAt this step I used double sided tape, I feel the magnets would have worked a little better. It can be hard to get the tape to stick to the pan. I will be switching it out soon.


Step 6:
Fill each opening with something for each of the twelve days of Christmas. You could do candy for each day. Or have a different activity for each day, things like baking Christmas cookies, reading a Christmas book, going out to see Christmas lights, etc. Pretty much anything you can think of you could do. Have fun with it and experiment with different ways to personalize the advent calendar.
I think this turned out so cute & I am so excited to use it this year! If you make your own 12 days of Christmas advent calendar be sure to stop by my blog [Im Simply Momma] and let me know. I would love to see everyone's calendars.
*Lacie
*Lacie


OMG this is soooo cute! I looove it
ReplyDeleteThis is an adorable idea!!! I may just have to do this. =)
ReplyDelete